Showing posts with label Thrifty. Show all posts

Sunday, October 27, 2013

Bedroom Makeover and DIY Yarn Wall Art


After getting home from our honeymoon, I spent a couple days cleaning up and reorganizing everything in our bedroom.  It makes me feel so much better once everything is in it's place - clutter and messes give me terrible anxiety and I can't get any work done until my space is tidy!  Before the wedding, our bedroom was packed full of wedding stuff (decorations and various odds and ends), and with it all gone I could finally get our bedroom back to looking like a bedroom rather than a storage space!

Matt and I have come a long way with our home.  If you would have seen it a couple years ago, you would barely even know anyone lived there.  Our living room was especially barren - no couches, no TV, just a stereo, a table, and our fish tank.  It didn't matter to us as much when we were younger and weren't really spending much time at home.  But, now that we're older and are busy, busy, busy all the time we really wanted to come home to a nice place and be able to relax.  So, being the geeks that we are, we furnished our living room, complete with a 3D Smart TV, 3D Blu-Ray Player, and an Xbox.  Now, we have a space to come home and just relax (and by relax I mean play video games).  Over the past couple of years, I've been working on decorating our then-bare walls and shelves.

Now, to the point of all this.  I had spent so much time focusing on the "public" spaces of our home (Living room, kitchen, bathroom, etc.) that I had completely neglected our bedroom.  Currently due to lack of space, our bedroom also serves as our "office" area.  Both of our computers and desks reside in our bedroom.  Since "upgrading" our living room, we have not been spending our time in our room at our desks surfing the web or playing games as we had in the past, which resulted in all the other rooms in the apartment being beautifully decorated, but the bedroom remaining to be boring and blah.


Well, I'd had enough of boring and blah!  I recently found something called yarn wall art on Pinterest and I loved it.  What a creative way of adding a little something to the plain walls of the bedroom!  The idea is simple:  decide on what image you want on the wall (I went with a saying, but you could do tons of other things besides letters!), add some nails and yarn, and BOOM - creative decor that everyone will love and ask you "where did you come up with this?!"

DIY Yarn Wall Art
What you'll need:
  • Nails (do not underestimate the amount of nails you will need - I bought twice as much as I thought I would need and used all of them).
  • A hammer
  • Lots of yarn in various colors (you will need a lot of yarn, depending on what image you're creating).
  • Either a printer or projector to put the image on the wall
  • Painter's tape (if using a paper printed image - or any other "less sticky" tape that won't pull the paint off your walls if you need to readjust).
I began by choosing the phrase "Sweet Dreams" for our bedroom wall (appropriate, right?) and also choosing the font that I liked best (I picked Impact to make the letters stand out boldly).  I printed the letters out with one letter per page in order to get them to be the size that I wanted.


Next, along with the help of my wonderfully handy husband, I measured out the spot I wanted the image to appear.  He helped me a TON with this part of the project.  Here are some tips on getting the image to be centered:
  • Take lots of measurements - measure the total length of the wall as well as the total length of the image will be placing on it.
  • Have a calculator handy - Calculate the length of half the wall.  Measure from one corner and make a mark at the length you calculated.  Do the same from the other corner.  The marks may not match up exactly, and that's okay.  The center of the two marks is the true center of the wall.  Do the same to find the center of the image.
  • Match up the center points of the wall and image - This was not as easy for my project because the center of my image fell somewhere in the spacing between the two words.  Make sure you have reference points to work from (for example, 10 inches from the center should match up with a certain letter/point on the image).
  • Tape is your friend - If you've printed the image onto paper, use painter's tape to tack the paper to the wall.  Painter's tape is easy to remove and re-stick where you need it.
  • Use a level -  If you want your image to be properly leveled, you will need a level.  There are apps that are available on both iOS and Android that can do this for you.  The one I used is called iHandy Level Free (you guessed it - it's free!).
  • Have someone else eyeballing it - instead of running back and forth from the chair I was standing on to the other side of the room to take a look at the whole image, I had Matt stand on the other side of the room and help me in making sure it looked just right.
After getting the image set up where you'd like it, begin placing the nails.  My best tip this step are to put one nail at each point where the image's outline curves or takes a turn (corners for example). 


As I said before, and as you can now see from my photo, you will use tons of nails, especially on "curvier" letters/images (like the "s" above).  For a finished product that is closer to the original image and less blocky or angular, you will want to place several nails closer together in order to direct the yarn.  We're working with straight lines here, people.  Just use your judgement - you don't want them too close together either or you'll lose the look of the yarn to the nail-heads.  Make sure you have plenty of nail sticking out of the wall as well.  I recommend about an inch of room, especially if you want your image to appear "fuller," as you'll need to wrap yarn around the nail several times.


After setting the nails in your desired pattern, take down the paper used as the template.  Make sure to get any little scraps left behind and clean up any pencil markings you made on the wall when placing the template.  Once the template is gone, it's much harder to visualize the image that you're trying to create.  This is one reason it would be easier with a projector as you could keep the image on the wall as you string the yarn.  Unfortunately, I don't have a projector so I had to go the old fashioned route!
 

Once the wall is cleaned up, the fun begins!  Tie the end of the yarn to one of the nails and begin twisting and wrapping the yarn around the nails.  It's very important to remember the outlines of the image while doing this step so that your yarn doesn't cross outside of the image to reach another nail.  To match the decor of our bedroom, I knew that I wanted my letters to have a fuller ivory area on the inside with a black outline and some lighter crossings of black on top of the ivory.  I started by criss-crossing ivory yarn all over the inside of each letter, filling in the image.  Once I was satisfied,  I cut the yarn with a good amount of room on the end to work with and tied the end around a nail, similarly to what I did to start the design.  Next, I started a black yarn and strung the yarn around the edges of the letter to give it an outline and then did a few crosses with the black on the inside of the letter.  I cut and tied off the end just as I did with the ivory.


Rinse and repeat on each letter or until your image is to your satisfaction.  Be creative!  Use multiple colors, designs, or textures!  I'd love to see what you come up with!  I'm hoping to continue my bedroom makeover by doing a few more DIY projects.  I want to do a rearrangement of the furniture and make a big upholstered headboard to go beneath the yarn art!  Also would like to paint the dresser that you can see peeking up from the right corner of the above photo.  I'll be sure to post more on my bedroom makeover adventure as it unfolds!

xo,
C

Sunday, June 30, 2013

Wedding on a Budget: The Beginning!


Maybe you know, maybe you don't, but Matt and I will be getting married this coming fall.  This is one of the main reasons that I haven't been posting anything in a while: I've just been so busy.  Planning a wedding (in under 6 months might I add) plus trying to finish up my degree (I'll graduate one week before the wedding) and working my awesome internship have left me with very little time to spare.  But, my crazy life can be your inspiration! I'm going to be presenting a wedding planning series called Wedding on a Budget (super catchy title, huh?).  I'll be sharing with you how I put together a fabulous wedding on a tight budget.


The first thought that came to my mind when we decided that we were finally going to plan a wedding for this year was: "where do I start?"  I was completely overwhelmed by the sheer amount of decisions I had to make.  Thus, being the nerdy girl I am, I took to Google and searched high and low for something that would help keep me on track and remind me of what needed to be done and when.  That's when I found The Knot.  This site has been a lifesaver to me.  It includes several planning tools such as a budgeter, guest list manager, and a checklist, all of which are accessible for free just for signing up on the site.  The checklist has been the best tool I have encountered for it's purpose.  It provides a timeline of "to do" items for planning a wedding so you won't forget a thing.  It's even customizable - you can delete tasks that you don't need and add custom tasks that aren't already included.  It has really kept me on track and on budget.


Speaking of budget - ours is small.  We've been cutting costs by doing a lot of things ourselves or with the help of our amazing and generous friends and family.  Most of the decorations are DIY projects that I'm working on myself, with the help of lots of other crafty ladies that love me!  The food is going to be home-made, cutting out the expense for catering.  The reception and ceremony will be held at the same place, eliminating the costs of bridal party transportation and a second rental fee on another venue.  We've had to come up with plenty of creative ways to conserve cash while planning this wedding, but I firmly believe that my wedding isn't going to be any less fabulous than even the most extravagant or big-budget weddings - I've just had to think out-of-the-box.


I'm so excited to share my journey with all of you.  I'll be posting about all sorts of topics throughout my planning process - including tutorials for some of my crafty decoration projects and recipes that I'm using - as well as posting more often.

-C

Saturday, December 17, 2011

Marvelous Mustache!

There are two things about me that you should know right away:
  1. I love to make/decorate stuff.
  2. I am cheap... or "thrifty" might be a nicer word :)


This year for Christmas, I decided to go the homemade route.  It is so special to see someone really enjoy a gift that you worked hard (or didn't work too hard) to make yourself!  I got the idea from one of my favorite bloggers, Kandee Johnson - actually where I get a lot of my ideas!

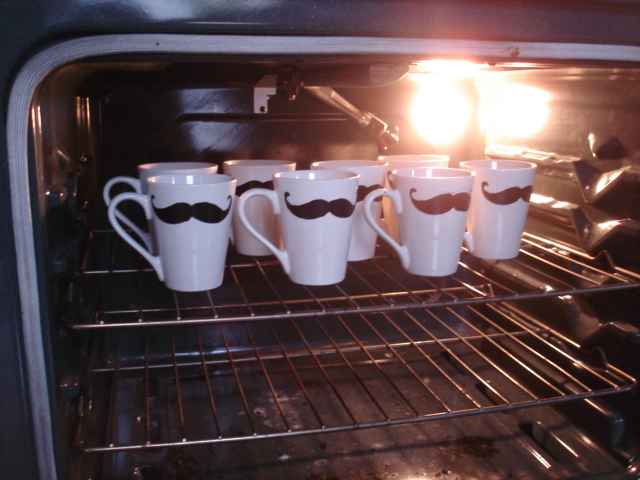
MUSTACHE MUGS!!!


     How cute is that?!  Mustaches are a really fun and quirky trend right now, and how much fun is it that when you sip from the mug, you are graced with a glorious handlebar mustache?!  Painting ceramics is always a creative and unique way to give a gift.  And, who doesn't love to save a buck or two? Especially around the holiday season, when expenses can sometimes be a little overwhelming!  I found these mugs at the dollar store, so I paid a whopping $8.00 for the mugs, and I now have gifts for 8 people checked off my list!
     All you need to start making these bad boys:
  • Ceramic mugs (got mine for $1.00 each at Dollar Tree)
  • A pair of scissors
  • Some tape (I would recommend using regular Scotch tape, but I think masking tape would work too-just don't use something heavy duty like packaging or duct tape)
  • Ceramic paint (I used FolkArt Enamels Acrylic Paint for Glass & Ceramics in color 4032 Licorice) MAKE SURE that you are using paint specifically for ceramics and that the paint can be set in order to make it dishwasher safe.  I got the bottle at Michael's Craft Store, for about $4 or $5.
  • Mustache stencil - Kandee's blog has a free downloadable image that can be used as a stencil, but I didn't have ink in my printer, so I drew mine by hand, using her's a reference.  Mine measures 4" across.
  • Paint brushes (If you are able to get a ceramic paint pen, then you don't need the brushes obviously, but my store didn't have any paint pens, so I had to go with the brushes.)  I used a sponge dotter on the stencil, and then used a fine brush to make touch-ups.     
HOW TO MAKE THEM:

Make sure your mugs are clean and dry BEFORE you start. - If you start with dirty mugs, the paint will have a hard time adhering to the ceramic.


Cut out your stencil and trim down the sides so that it will fit nicely onto the rim of the mug.


Line up the stencil on the mug (with the handle on the left for a right hander, on the right for a lefty.) and tape down to prevent it from moving.


Apply the paint to the stencil - I dotted the paint with the sponge and it gave the image a bit of a textured look that is neat.


Let dry just a minute, so the paint isn't disturbed when you remove the stencil, and then remove the tape and lift stencil off gently.


Go over any rough edges or lighter spots with a fine paintbrush.  As per the instructions on the paint, I let mine air dry 1 hour before baking them to set the paint.


To go with the mustache mugs, I also made hot chocolate mix to give with it.

     Happy holidays <3