Wednesday, October 17, 2012

Halloween DIY: Fantasy Inspired Staff


Halloween.  My favorite of all holidays for multiple reasons:
  • Horror movies are my favorite.
  • Dressing up is so much fun.
  • Haunted houses
  • Carving pumpkins
This year, a friend of mine and I decided against spending an insane amount on a store-bought costume that we'd probably only wear one time.  Instead, we are making our own costumes.  This way, we can be exactly what we want and make it look completely unique.  So what did we decide to be for Halloween?  The obvious (and nerdy) choice: our warlocks.

Both of us being World of Warcraft players (as well as both playing a warlock as our main), this choice just made sense.    As my warlock is a Blood Elf, the inspiration for my costume was drawn from this picture.

The first step in creating my costume masterpiece: the Staff, which I modeled after the Golden Staff of the Sin'dorei.  Making this was a lot easier than it looked, and I think it turned out really great!

Finished!
Things I used to make this:
 - 1" pvc pipe (was about $2.30 for 10 feet, we cut it in half to make two 5 foot poles)
- Wooden fence post topper (what the staff's head design is mounted on)
- pvc pipe cap
- spray foam insulation (the kind you'd use to fill cracks outdoors)
- foam-filled poster board
- spray paint
- hot glue gun
 

First, I drew out the design onto a sheet of paper.  To make this easier, I just blew up a picture of the staff's design on my computer and then taped a sheet of paper to my monitor and traced the shape.  It could be even easier if you have a printer at home.  You'd just have to blow it up to the right size and print it out.

Once I got the shape that I wanted and cut it out of the paper, I taped the paper down to the poster board.  Tape all the way around every edge, that way it wont move while cutting.  I was lucky enough to get Matt to help with this part - he cut out my shapes with a razor knife.  Remember to make two of each shape - that way your design will have more of a 3D effect instead of just being a flat top.


Next, we took to the outdoors and spray painted everything the colors that we wanted.  On a side note, the gold spray paint we got was really cool and only needed one coat to cover what we had.  This included the pvc pipe, the cutout shapes, and the fence post topper.


Be sure to get both sides of each of the cut-outs painted, as well as the edges.
Once all the paint is dry, you can start putting the staff together.

First, spray some of the foam insulation into the very top of the pvc pipe (the end that you want to be the top - the other end should have the pvc cap on it).  Set the pipe aside to let the foam begin to dry.
Using hot glue, mount your two main design pieces to either side of the fence post topper.
This photo better shows how the poster board pieces are secured to the fence post topper.  One piece is glued on either side of the square topper.  This is my friend's staff inspired by Staff of Beasts.
Once the hot glue is dry (this should only take a couple minutes), return to the pvc pipe.  While the foam is still drying, put some hot glue around the rim of the pipe, as well as on top of the drying foam.  The fence post topper should then be inserted into the foam - it will dry around the screw at the bottom of the topper and hold it in place.  Once it is in the position you'd like it, add some more hot glue around the edge where the pvc pipe meets the topper to give it a good seal and to help firmly secure the top.  This will be very top heavy - be careful!  You could add a heavy duty screw to the bottom of the pipe (secured to the inside of the pvc cap) if you'd like to even out the weight a bit.

Let it dry overnight and you'll have your very own fantasy-inspired staff!


Find the armor making tutorial here.

xoxo,
-C


Monday, September 24, 2012

Soup's On!

Last Saturday was the first day of fall.

Fall colors are one of my favorite things about this season!
The weather forecasters called for freezing temperatures overnight Saturday through early Sunday morning here in the Midwest.  I am not ready for that kind of cold - it feels like it was just 90 degrees and the swimming pool was sounding like a great idea!

But, because the Fall feeling was taking over, what better way to "celebrate" the end of summer and the beginning of  autumn than a warm bowl of creamy soup made in the Crock-Pot?  As I was feeling not-so-great with my seasonal allergies taking their toll, this soup idea sounded like a dream come true.

Soup in first phase of cooking
I have never made soup from scratch before.  I have wanted to for some time now, and with the cold temps being forecasted, I thought this was a great time to do it!  For inspiration, I consulted Pintrest (of course) and browsed through dozens of slow cooker recipes before deciding on making cheese and potato soup.  After reading through a few different recipes, I created my own recipe for the soup, using the others as measurement guides.

Let me tell you, this ended up being the best soup I have ever had.  Better than any store bought brand, better than any I've had at a restaurant.  I'm so glad that Matt enjoys being my cooking experiment guinea pig - he rated this soup as one of the "top 5" things that I have ever made (He's been eating it up all weekend since I made it!).  All of the vegetables and the cheddar used in this recipe came from (you guessed it) my favorite farmers market, so most of this recipe is using locally grown and made ingredients!  It's important to support local growers!  Keep scrolling down for my recipe!

Final product - garnished with shredded cheddar and fresh parsley
(straight from my patio "garden")
Cody's Cheese & Potato Soup
  • 2 pounds potatoes (peeled and cubed)
  • 1/2 large green pepper (chopped)
  • 1/2 large head of broccoli (chopped) - I didn't measure the exact amount, I just added until I thought it "looked right."  You could probably substitute a small package of frozen broccoli here.
  • 1 1/2 cups Velveeta (cut into 1/2 inch cubes)
  • 2 cups shredded cheddar cheese (a bit more if you'd like to garnish)
  • 1 can (10.75 oz) cream of chicken soup
  • 1 1/2 cups milk
  • 3 tablespoons flour
  • 1 1/2 cups water
  1. Add water, cream of chicken, potatoes, green pepper, and broccoli to slow cooker and stir until mixed well.  Cook on low for about 6 hours or until potatoes are cooked to your liking.
  2. After vegetable mix is cooked, add Velveeta, cheddar, milk, and flour and stir until flour is well blended.  Replace lid and cook for another hour on low, or 30 minutes on high.  Be sure to stir the soup a few times during this cooking phase.
I have gotten about 5 servings from this recipe.  It can be altered for larger groups or put into containers and frozen.

Hope you enjoy!  Let me know if you tried the recipe and what you thought!
xo,
- C

Thursday, September 20, 2012

Perfect For Summertime


I don't want to have to be the one to break the news to you but...

Summer is almost over.

I know, I know - I don't want it to be either.  But fall is coming, which means Pumpkin Spice Lattes, sweaters, football, and gorgeous fall leaves.

To celebrate summer and send it on its way, what better than to make  a dinner filled with the best that summer has to offer?  Nothing like BLTs and sweet corn to bring out the flavors of summer.

The tomato was fresh from my patio "garden" and of course, the corn, cheese, and bacon came from my favorite farmers market.  Absolutely delicious.


The farmers market here runs until October.  This means I only have a couple weeks left to get all this amazing fresh produce and fun crafty stuff.   What will I do when the market closes for the fall and winter?!?!

Happy Autumn!
xo,
- C

Sunday, July 15, 2012

Finally a "Cornhusker"


For my whole life, I have never liked corn.  As I said before, I am not a veggie fan, but I probably liked corn the least of all.  Something about the texture and the flavor was just not right to me, and I have never been one to eat it.  Living in Nebraska, aka The Cornhusker State, one can see how this situation gave my family members room to make hilarious comments like, "how can you be a Cornhusker if you don't like corn?"  (As if I have never heard THAT one before...) but I'll get back to this later...

As many of you know, I have made a mission of this summer to start trying new things in the kitchen.  Once again, after a trip to the Saturday morning Haymarket Farmers Market, I came home with a bag full of locally grown and made goodies for a new cooking adventure.


This cheese is what began the idea.  The lady who was running the cheese stand this weekend said to me, "This flavor is great in macaroni and cheese," which got my attention immediately (as everyone knows my love of mac & cheese).  It has small bits and pieces of red bell pepper inside, giving it the most amazing flavor.  So, being the creative genius that I sometimes claim to be, I came up with a hybrid recipe that combined two of my favorites, the Kraft Homestyle baked mac & cheese and my own recipe of homemade mac and cheese.


Instead of using regular Velveeta, I used the Queso Blanco variety and left out the black pepper.  After pouring the mac and cheese into a baking dish, I shredded the Havarti Bell cheese and sprinkled it on top and baked at 425 for about 8 minutes.


I know I say this every time I try a new experiment, but this really was the best mac and cheese ever.  The flavor was perfect, and the bits of bell pepper really added that "something" that kicked this up from bland to awesome.

Now, as I said before, I have never enjoyed corn.  That morning at the farmers market, Matt wanted to get some sweet corn, and my parents showed us the right place to find the best quality.  I have no idea how to cook sweet corn (as I found out, it's probably one of the easiest things to cook I have ever seen), so I enlisted the help of my "lovely assistants."


Matt and his brother got the sweet corn ready, and I decided to try it, in the name of my vow to try more veggies.

I came to this conclusion:
Congrats, family members.  I can finally be a "Cornhusker."


xo
-C

Saturday, July 7, 2012

Farmers Market Finds

I have never had a taste for veggies.  Call me crazy, but I have just never liked the taste of most of them.  What's even more silly is that the vegetables I do eat are almost always canned.  I always say fresh or frozen veggies taste like grass to me.  I have made it my goal over the summer to eat more fruit and vegetables.  The fruit part isn't a problem - I love all kinds of fruits (bananas and strawberries are my favorites)!

On a trip to the farmers' market (I really love going to these!) I got some fresh carrots, baby potatoes, and green beans in an attempt to make myself eat more healthily.  I used these in a veggie medley with herbs that I have been growing on my patio "garden" and served them along with pan-seared steaks and garlic bread.

Garlic bread, pan-seared steak, and veggie medley


My patio herb "garden"

The herbs really gave the veggies a big kick of flavor, and all ingredients used in the medley were locally grown!  As I said, the vegetables were bought from the farmers' market and came from various local growers, and the herbs were grown on my patio!  It was also a very healthy side dish - I cooked the veggies in water only (no butter).  After they were done, I seared the steak in the same pan the veggies were cooked in so they had a hint of flavor from the herbs as well.  Lastly, I popped the steaks in the oven to finish cooking through.  This meal is one of my favorite recipes I have made in a long time!


**NOTE**
Some of you are used to me posting my recipes and culinary adventures on my other blog, Cody's Cooking. I will no longer be using that blog for two reasons.
  1. The name/theme of the blog is too single-minded.  I have many other things I want to blog about besides cooking.
  2. More than one blog is just too much for me to work on right now.  After all my course work (and being less than a year away from graduation) I barely have enough time to cook, let alone keep up a blog JUST about cooking.  By combining, I can post fairly regularly again without having to cook an awesome meal every single day.
I hope that everyone will start following me here.  I'll be posting all sorts of random things.

xoxo
-C

Friday, June 22, 2012

What a Hoot!

Have I ever mentioned how much I love owls???

     Ever since I was little, I have loved owls.  One of my favorite books when I was a kid was a National Audubon Society field guide to North American birds, and there was a permanent crease in the binding from turning to the section on owls constantly.  Saw-whet owls (like the ones in the photos) were always my favorite; they are just so pretty!  I love the way they look - they are what I picture whenever I think of "owl."
     I love that "retro" owls are very trendy right now. You will see them everywhere if you look:

- on clothing
- fabric by the yard

I even have a Pinterest board dedicated to my love of these feathered creatures!  A couple months back I got an owl necklace at a really cool store at the mall called Earthbound Trading Company.  This piece is the very first thing that fueled my hunt for all things owl.


Over the past few months, I've been collecting owl-themed items since I see them everywhere now!  My newest (and favorite) piece is a wooden wall/door hanger owl.  This HANDMADE decoration was a fun piece I found at a farmers market last weekend.  The most fun part of this little guy? His belly area (the dark gray painted area) is a chalkboard.


I have had friends give me owl-themed things as gifts lately, too.  Wall hangings, wall stickers (I'm sure there is another name for those things, but I can't think of one!), etc.  I'm so happy with this owl trend!  One day I hope to have an owl/woodland themed room in my home.  Possibly a library or (in the distant future) a nursery.  The possibilities are endless (well, at least for me!).

xo
-C

Saturday, December 17, 2011

Marvelous Mustache!

There are two things about me that you should know right away:
  1. I love to make/decorate stuff.
  2. I am cheap... or "thrifty" might be a nicer word :)


This year for Christmas, I decided to go the homemade route.  It is so special to see someone really enjoy a gift that you worked hard (or didn't work too hard) to make yourself!  I got the idea from one of my favorite bloggers, Kandee Johnson - actually where I get a lot of my ideas!

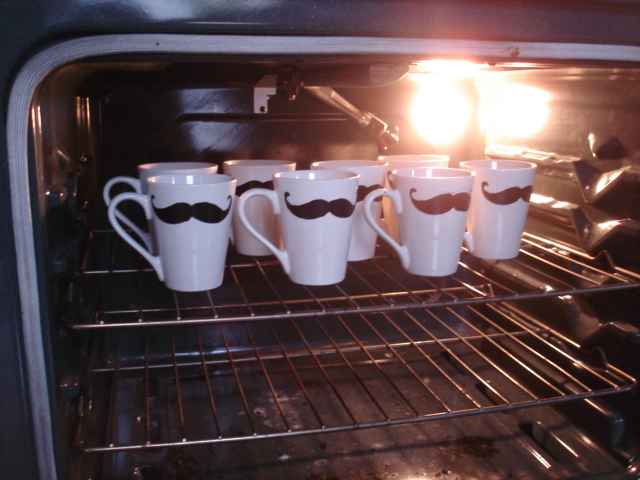
MUSTACHE MUGS!!!


     How cute is that?!  Mustaches are a really fun and quirky trend right now, and how much fun is it that when you sip from the mug, you are graced with a glorious handlebar mustache?!  Painting ceramics is always a creative and unique way to give a gift.  And, who doesn't love to save a buck or two? Especially around the holiday season, when expenses can sometimes be a little overwhelming!  I found these mugs at the dollar store, so I paid a whopping $8.00 for the mugs, and I now have gifts for 8 people checked off my list!
     All you need to start making these bad boys:
  • Ceramic mugs (got mine for $1.00 each at Dollar Tree)
  • A pair of scissors
  • Some tape (I would recommend using regular Scotch tape, but I think masking tape would work too-just don't use something heavy duty like packaging or duct tape)
  • Ceramic paint (I used FolkArt Enamels Acrylic Paint for Glass & Ceramics in color 4032 Licorice) MAKE SURE that you are using paint specifically for ceramics and that the paint can be set in order to make it dishwasher safe.  I got the bottle at Michael's Craft Store, for about $4 or $5.
  • Mustache stencil - Kandee's blog has a free downloadable image that can be used as a stencil, but I didn't have ink in my printer, so I drew mine by hand, using her's a reference.  Mine measures 4" across.
  • Paint brushes (If you are able to get a ceramic paint pen, then you don't need the brushes obviously, but my store didn't have any paint pens, so I had to go with the brushes.)  I used a sponge dotter on the stencil, and then used a fine brush to make touch-ups.     
HOW TO MAKE THEM:

Make sure your mugs are clean and dry BEFORE you start. - If you start with dirty mugs, the paint will have a hard time adhering to the ceramic.


Cut out your stencil and trim down the sides so that it will fit nicely onto the rim of the mug.


Line up the stencil on the mug (with the handle on the left for a right hander, on the right for a lefty.) and tape down to prevent it from moving.


Apply the paint to the stencil - I dotted the paint with the sponge and it gave the image a bit of a textured look that is neat.


Let dry just a minute, so the paint isn't disturbed when you remove the stencil, and then remove the tape and lift stencil off gently.


Go over any rough edges or lighter spots with a fine paintbrush.  As per the instructions on the paint, I let mine air dry 1 hour before baking them to set the paint.


To go with the mustache mugs, I also made hot chocolate mix to give with it.

     Happy holidays <3